Sunday, March 19, 2023

To Configure Workbasket Assignment with Skills


Pega PRPC had provided many security / restriction configurations with which we can restrict the access and to make sure right person access the workobject.

Now in the post we will see how to restrict the access of the workobject with skills.

Scenario for using skill:

A list of work object in a workbasket, but specific skilled people from the group alone should be allowed to open the work object and process it.

In Assignment, skills to be specified and in Assign-Workbasket Access to role to object, mention the Access When to check if the operator is having required skill or not. And only for those required operators specify skills.

Screen shot illustration of configuration is given below:

In the required assignment, mention the skill which is required to process the case.

And for the role you wanted to restrict, need to provide the access when condition, so that it will provide the access, only when condition satisfies.


This is sample when condition i had given below. similar conditions can be changed according to our requirement.
ex:
OperatorID.pySkills(1).pySkillName==.pxSkillsRequired(English)


Only Repeat2 user need to access this workobject, and user.repeat should not be allowed to access, so only Repeat2 user is provided with Skills.


When User.Repeat is accessing the work object he is not able to access from the workbasket and getting the error, since he doesn't have required skill.


this is when Repeat2 logged in and access the work obiect.


*****End of the implementation*****

Note: Please feel free to give corrections if any. There can be many ways this same scenario can be implemented, so if you any also please suggest, we can add to the blog, it will help for all.

Monday, July 25, 2022

To Run particular agents in Specific node

 To enable particular set of agents in set of nodes:

Scenario: On Some scenario, only particular set of agents need to be run in specific nodes, example, Search, BackgroundProcessing, Stream nodes. Because running other agents/unwanted agents on these nodes may cause system slowness or performance issues.

To allow only particular list of agents to be executed, below parameter need to be used while starting the servers:

-DIncludeAgents="RuleSet1:AgentName1,RuleSet1:AgentName3,RuleSet2:*"


1) Rulesets need to be replaced by Ruleset where particular agent created and AgentName will be same given in the description of each agents.

2) If all the agents from particular agents need to run, then "*" need to be add after the Ruleset name.

[SS]

To exclude any agents needs to be run in that node:

then below syntax need to be used

-DExcludeAgents="RuleSet1:AgentName1,RuleSet1:AgentName3,RuleSet2:*"


One Exception to the above configuration:

Kernel categorised agents which will continue to run irrespective of the agents mentioned in include/Exclude agent comments


Note: In both the parameters, same name cannot be given for both exclude and include which will be illogical.

Please refer to the below link from Pega PDN site for more details:

https://docs.pega.com/system-administration/configuring-nodes-run-selected-agents

Monday, February 24, 2020

Common Config Settings for Pega Server

Common Security vulnerabilities for Pega will be found during Security scan:

For any application Security scanning will takes place. And most of the security warnings will have below two error messages which are usually considered as low:

1)Error Message:
Session Cookie Does Not Contain the "Secure" Attribute
In session cookies "secure" word, is not there, then using normal javascript and http injection can be done to hack the session cookies, so its recommendable to add this attribute.

Resolution:

Perform the following local-change: 
Add the below Dynamic System Settings(DSS) in Pega PRPC, so it will be applicable for all the servers/nodes which pega is connected.

prconfig/HTTP/SetSecureCookie/default
value = "true"
Owning ruleset  -  Pega-Engine

Else if this need to be apply only to particular node, then in the config file we can mention it.
<env name="HTTP/SetSecureCookie" value="true" />
=======================

2)Error Message:
Cookie Does Not Contain The "HTTPOnly" Attribute
In session cookies "HTTPOnly" word, is not there, then using normal javascript and http injection can be done to hack the session cookies, so its recommendable to add this attribute.

Resolution:
Perform the following local-change: 
Add the below Dynamic System Settings(DSS) in Pega PRPC, so it will be applicable for all the servers/nodes which pega is connected.

DSS: purpose - prconfig/cookie/HttpOnly/default(default can vary based on node classification)
         Ruleset  - Pega-Engine
         Value     - true

Restart the server after this DSS is set to take the changes affect

Else if this need to be apply only to particular node, then in the config file we can mention it.
<env name="HTTP/SetSecureCookie" value="true" />
=======================

Note: Please let me know, similar to this if any common issues will be found, we can add it in the post, so that it will be help for all of us to know.

Wednesday, February 5, 2020

LDAP Implementation in Pega PRPC

LDAP Implementation with Simple Authentication:

In Pega PRPC, I had tried LDAP Authentication. I had followed the same steps mentioned in the below link, in personal edition for trail and learning purpose. Its working without any changes.
https://community1.pega.com/community/product-support/question/how-cofigure-server-based-authentication-ldap

1) Install LDAP server:
Downloaded Apache Directory Studio and installed the server. 
https://directory.apache.org/studio/download/download-windows.html

Import some sample data from google by searching with  sample ".ldif" file - which is the format of the LDAP data. by default LDAP Port will be 389, 10389:
My LDAP URL is: ldap://localhost:10398

Sample screen shot from data and structure of data has been given below:
dc=example, dc=com
ou=Management
cn=1(user1)
cn=2(user2)


2)Create an authentication Service - Named(in this example) "TestLDAP1" - and AuthenticationTimeout and Authentication Activity, mention it.
Then we need to configure - Search directory and Filter Criteria and Parameter.

Screen shot from 


and then set the other attributes from the LDAP which is required for pega configuration and process identification.


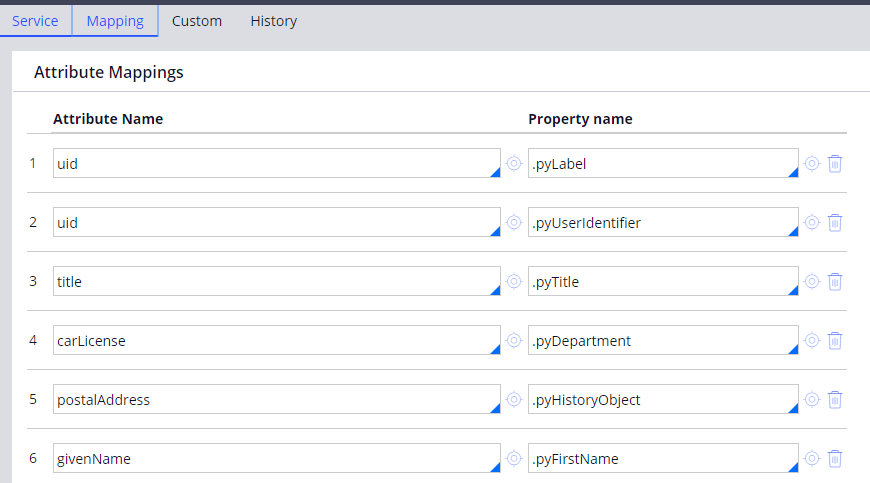
set the model operator to which it need to copy and create a new operator ID, for first time login.
If we updated the Model Operator ID, then we need to mention the access group in Unauthenticated AccessGroup, else default configuration is fine.

3)If app server is Tomcat, then web.xml need to be modified, else correponding <<web app>>.xml based on the app server pega is deployed.

4) update web.xml file in the below format, in AuthService parameter mention the newly created Authentication Service name. In this example - TestLDAP1
so that if below URL is used it will pick the servletname and correponding Auth Service.
http://localhost:9085/prweb/PRWebLDAP2

<servlet>
<servlet-name>WebLDAP2</servlet-name>
<display-name>WebLDAP2</display-name>
<description>Authentication using LDAP (reserved for configuration wizard)</description>
<servlet-class>com.pega.pegarules.internal.web.servlet.WebStandardBoot</servlet-class>
<init-param>
<param-name>PegaEtierClass</param-name>
<!--  COMPONENTS: This was previously com.pega.pegarules.services.HttpAPI -->
<param-value>com.pega.pegarules.session.internal.engineinterface.service.HttpAPI</param-value>
</init-param>
<init-param>
<param-name>AuthenticationType</param-name>
<param-value>PRCustom</param-value>
</init-param>
<init-param>
<param-name>AuthService</param-name> --  TestLDAP1 
<!--<param-value>WebLDAP2</param-value> -->
<param-value>TestLDAP1</param-value>
</init-param>
<init-param>
<param-name>RuntimeServletName</param-name>
<param-value>PRWebLDAP2</param-value>
</init-param>
<init-param>
<param-name>SecureServletName</param-name>
<param-value>PRWebLDAP2Auth</param-value>
</init-param>

5)Now open new browser and enter the

enter user and pwd from data you loaded through sample.ldif file.

you can see the screen/portal which you are logging on.

Please let us know if any other updation, we will update it, it will be helpful for others as well.

Friday, January 3, 2020

Creating Excel Sheet with HTML Tags and sending as Email attachment

Creating Excel sheet with HTML Tags and Sending as Email attachment

In Pega PRPC, creating Excel sheet can be done in below ways:
1)By POI jar, using custom java code to create the Excel files with any custom record.
2)Using MSOGenerateExcel activity, which will use template excel to generate the properties to map and generate Excel
3)Using Just HTML table tags to create Excel file - we will see about this in this post.

Steps to follow:
1) Create an AttachmentPage and set the decode flags.


2) Call RDB List with SQL Query to generate the Page list which are to be exported to excel.

3) In a Parameter Flag, create a header tags in HTML table.
Param.XmlValue = "<HTML><BODY><TABLE border='1'><tr><td>Property1</td><td>property2</td>
<td>property3</td><td>property4</td></tr>"

4) Looping on the result which we got in Step 2 and set the values in tr td tags.
Param.XmlValue = Param.XmlValue + "<tr><td>""+.Property1+"</td><td>"+.property2+
"</td><td>"+.property3+"</td><td>"+.property4+"</td></tr>"


5) In Property set, Param.XmlValue = Param.XmlValue + "</table></body></html>"


6) attachment page, pyData string with @Base64Encode(Param.XmlValue)


7) Send Email Notification: - get the email account details and set some message in the mail if needed in the correspondence rule and set the resulted value to Param.Message.


Sunday, April 28, 2019

Config Settings in PRPC Pega - Part 1

Config Settings in Pega PRPC version 6 and above:

Please find the sample config xml tags (prconfig.xml), if any specification need to do for some particular nodes alone.

In this post, we will see few of the tags used in our application, had added explainations which I know. Remaining tags we will review in next upcoming posts.

Please add if you have any settings which is not given below and usage of its. It will be helpful for understanding.

<!-- All the config settings are explained in details for pega 6.2 version, but still the same config settings can be used in 7.1 also, Updated versions are yet to get, if any one get the updated, please share the link in comments, it will be helpful for all

https://community.pega.com/knowledgebase/documents/configuration-settings-reference-guide-prpc-5x-prpc-62
-->
<?xml version="1.0" encoding="UTF-8" ?>
<pegarules>
<!-- system name which you wanted to give -->
<env name="identification/systemName" value="CustomSystemName" />
<env name="identification/cluster/public/address" value="169.254.169.254" />

<env name="initialization/persistRequestor" value="OnTimeout" />
<env name="initialization/useNativeLibrary" value="true" />
<env name="initialization/explicitTempDir" value="${pega.tmpdir}" />
<env name="initialization/explicittempdir" value="/amp/apps/tcpegaewf00/properties/explicitTempDir"/>

<env name="initialization/displayExceptionTraceback" value="false" />
<env name="initialization/persistrequestor/usepagelevelpassivation" value="false" />

<env name="initialization/passivationinterval" value="7200"/>
<env name="initialization/ContextRewriteEnabled" value="true"/>
<env name="initialization/SetBaseHTMLContext" value="https://eworkflow.ampf.com/prweb"/>
<env name="initialization/preloadengineclasses" value="com.pega.pegarules.priv.util.StackTrace com.pega.apache.log4j.spi.ThrowableInformation"/>

<!-- As of 6.1 SP2, settings are available in the database but are not yet the default -->
<env name="initialization/settingsource" value="file" />
<env name="initialization/settingsource" value="merged" />


<env name="authentication/trojanhorseprotection" value="1"/>
<env name="diagnostic/clipboard/pageNamesToTrace" value="CTIPhone" />

<!--for setting time out for the application --> 
<env name="timeout/application" value="14400" />
<env name="timeout/browser" value="14400" />
<env name="timeout/portlet" value="9000" />
<env name="timeout/thread" value="7200"/>
<env name="timeout/page" value="7200"/>

<!--HTTP related config settings -->
<env name="HTTP/SetSecureCookie" value="true" />

<!-- AES related config-->
<env name="management/enabled" value="true" />
<env name="management/interval" value="120" />
<env name="management/notifications/appender" value="ALERT-AES-SOAP" />
<!-- use the following entry to specify resource adapter logging level at startup,
acceptable values: SEVERE,WARN,INFO,CONFIG,FINE,FINER,FINEST
-->
<env name="pradapter/loggingLevel" value="INFO" />
<env name="agent/enable" value="true" />
<env name="initServices/initEmail" value="true" />
<env name="initServices/initFile" value="true" />
<env name="initServices/initJMS" value="true" />
<env name="initServices/initMQ" value="true" />
<env name="initservices/initmq/pollers" value="true" />

<!--Tracer related config settings:
You can adjust the buffer size of the Tracer header to increase the limit for unprocessed events. By default, the system saves up to 50,000 items for unprocessed events during a Tracer operation. If the buffer exceeds this limit, Tracer processing ends.
-->
<env name="tracer/queue/type" value="file"/>
<env name="tracer/queue/file/limit" value="nnnn"/> 
<env name=" tracer/queue/header/limit" value="nnnnn"/>

<!-- Database related config settings -->
<env name="database/storageVersion" value="6" />
<env name="database/databases/PegaRULES/dataSource" value="java:comp/env/jdbc/PegaRULES"/>

<env name="database/databases/PegaDATA/dataSource" value="java:comp/env/jdbc/PegaRULES"/>
<env name="alerts/database/acquireConnectionAlertMS" value="200" />
<env name="database/transactionalLockManagement" value="Standard" />
<env name="database/baseTable/name" value="pr4_base" />

<!-- One database instance can support multiple separate systems that use distinct schemas. The prconfig.xml file for each system must correctly identify the schema to use. 
-->
<env name="database/baseTable/schema" value="schema name" />

<env name="database/drivers" value="com.microsoft.sqlserver.jdbc.SQLServerDriver;oracle.jdbc.OracleDriver" />
<env name="database/databases/PegaRULES/url" value="jdbc:sqlserver://serverName:1433;SelectMethod=cursor;SendStringParametersAsUnicode=false" />
<env name="database/databases/PegaRULES/userName" value="a_username" />
<env name="database/databases/PegaRULES/password" value="a_password" />
</pegarules>

Wednesday, April 10, 2019

Logging in Pega PRPC - Part 2

Logging in Pega PRPC - Part 2

In this blog, we will see about logging the pega rules in log file for debugging purpose. But once debugging is done, it should be removed, else performance of the application will be bad.

How this can be achieved, has been given in detail in the pega PDN link below:
https://community.pega.com/knowledgebase/articles/log-customization-prloggingxml-file#capture

From the above link we had taken small part, which is logging the rules.
By Adding the below format in the prlog4j2.xml file in 7.3 version and out of the log file will be as shown below:

Sample format in the XML:
Under loggers object, you need to add this logger tag name.
name will be the rule type,which we need to trace or debug, but it should be given in java class.

The format for the Pega 7 Platform Java class instances is a three-part name, separated by periods.


  1. The leftmost part refers to whether the object in question is an activity, a when rule, or a model. The name refers to the class of those objects: Rule-Obj-Activity, Rule-Obj-When, or Rule-Obj-Model, with underscores instead of hyphens.
  2. The middle portion of the reference is the actual name of the object (the activity, when block, or model).
  3. The final portion of the reference is the class on which the activity, when or model is defined. For the example above, the reference would be: Rule_Obj_Activity.Validate.Work_General


If the final portion of the name was omitted (Rule_Obj_Activity.Validate), then messages for all Validate activities would print out, regardless of in what class they were defined. Likewise, if developers are interested in printing out messages for all Activities, they should use the first part of the reference (Rule_Obj_Activity), to get all messages for activities.

<Loggers>
<Logger name="Rule_Obj_Activity" additivity="false" level="info">
<AppenderRef ref="PEGA"/>
</Logger>

<Logger name="Rule_Obj_Model.pyDefault" additivity="false" level="info">
<AppenderRef ref="PEGA"/>
</Logger>
</Loggers>

Sample log file generated:

2019-04-10 23:14:45,091 [http-nio-8080-exec-3] [  STANDARD] [                    ] [       VISA:01.01.01] (Rule_Obj_Activity.Invoke.Rule_Connect_REST.Action) INFO  localhost|0:0:0:0:0:0:0:1 Author.VISA - Starting remote service invocation...
2019-04-10 23:14:50,048 [http-nio-8080-exec-3] [  STANDARD] [                    ] [       VISA:01.01.01] (Rule_Obj_Activity.Invoke.Rule_Connect_REST.Action) INFO  localhost|0:0:0:0:0:0:0:1|Rule-Connect-REST.Pega-Int-PDN-Rss.pyRSSConnectService Author.VISA - Finished remote service invocation

Above log file has been generated, when Rule_Obj_Activity.Invoke.Rule_Connect_REST.Action this activity is called during execution.

Tuesday, April 9, 2019

Logging in Pega PRPC

Logging in Pega PRPC:
Logging is an important component of the software development. 
A well-written logging code offers quick debugging, easy maintenance, and structured storage of an application's runtime information.

By default pega had configured Log4J for logging.

Details about the components is explained in PDN link:
https://community.pega.com/knowledgebase/articles/log-customization-prloggingxml-file#capture

Log4j artchitecture you can read it from the below URL:
https://www.tutorialspoint.com/log4j/log4j_quick_guide.htm

More details of the prlogging.xml structure is well explained in the apache site
https://logging.apache.org/log4j/2.x/manual/configuration.html

In logging, all the objects are segregated into two major Object Types:

Core Objects: Mandatory Objects of the framework. composed of objects like Logger Object, Layout Object, Appender Object.

Support Objects: Optional Objects of the framework, but yet do important tasks. This is composed of objects as Level, Filter, ObjectRenderer, LogManager.

In this post we will see how we can customize For Pattern Objects:
Sample Example from Pega prlogging.xml file given below:

<Pattern>%d [%20.20t] [%10.10X{pegathread}] [%20.20X{tenantid}] [%20.20X{app}] (%30.30c{3}) %-5p %X{stack} %X{userid} - %m%n</Pattern>


this is the current logging pattern, we will change this as 

%-6r [%t] %L %-5p %c %x - %m%n

r - meant for elapsed time
t - for thread where its logging
p-priority(info, warn, debug, etc)
c-full class name from where logging is happening
m-message
n-to enter new line

With the above format if we restart the server, to check the new format in pega log.

14752  [localhost-startStop-1]  %I  INFO  com.pega.pegarules.generation.internal.PRGenProviderImpl [] - invokeDynamic instrumentation for inlining is enabled
14752  [localhost-startStop-1]  %I  INFO  com.pega.pegarules.generation.internal.PRGenProviderImpl [] - Assembly Version: 762781845

Set of available logging parameter references are given in the below links, we can do play around to see how its used. some default logging parameters some are overridden for pega.
https://logging.apache.org/log4j/1.2/apidocs/org/apache/log4j/PatternLayout.html


Friday, March 29, 2019

Pega Exchange - Database Query Extractor

Query Extractor:

Another Tool in pega exchange. This tool is used to extract the query, which will be formed while report definition or listview or Summary view is running.

Usually you can see the sql in ReportContentPage in clipboard, with pxSQLStatementPre or pxSQLStatementPost.

pxSQLStatementPre will have table names with corresponding class name and other where conditions will be with property mentioned in the rule.
pxSQLStatementPost will have replaced class names with the corresponding table name, configured in pega Database tables. and Where condition properties are replaced with Query Strings with "?" symbol.

And in the clipboard, pyPreparedValues value list property will be there in the sequence with the values which will replace the query strings.

QueryExtractor has been developed by Pega, and they had given it for us easy use. we can download it from the below URL. It contains code archive ZIP file and the document for configuring it in your application and how to this utility can be used.

Download the Query Extractor from the below URL:
https://community1.pega.com/exchange/components/database-query-extractor

When we run this utility, it will pop up with the sql generated and Query strings replaced with the corresponding values.

So that we can get the string and directly run in the SQL databases to check what value is returned or why its taking so much time to execute it.

Download file, and extract the ZIP, "QueryExtractor.zip", and import it into your application.

Follow the steps mentioned in the document "How to use-QueryExtractor.docx"

Sample data used in our example:
pyReportName: pyInstanceList

pyReportClass: Data-Admin-Operator-ID

Steps to follow:


In pxSQLStatementPost Property value will be as:

SELECT "PC0"."pyusername" AS "pyUserName" , "PC0"."pxupdatedatetime" AS "pxUpdateDateTime" , "PC0"."pxupdateopname" AS "pxUpdateOpName" , "PC0"."pyworkgroup" AS "pyWorkGroup" , "PC0"."pyaccessgroup" AS "pyAccessGroup" , "PC0"."pzinskey" AS "pzInsKey" FROM data.pr_operators "PC0" WHERE "PC0"."pxobjclass" = ? ORDER BY 2 DESC

you can see the "?" inbetween the query which will be replaced in the run time, instead of that by the using this utillity we can get it on screen itself.

Query formed will be as follows:

SELECT "PC0"."pyusername" AS "pyUserName" , "PC0"."pxupdatedatetime" AS "pxUpdateDateTime" , "PC0"."pxupdateopname" AS "pxUpdateOpName" , "PC0"."pyworkgroup" AS "pyWorkGroup" , "PC0"."pyaccessgroup" AS "pyAccessGroup" , "PC0"."pzinskey" AS "pzInsKey" FROM data.pr_operators "PC0" WHERE "PC0"."pxobjclass" = 'Data-Admin-Operator-ID' ORDER BY 2 DESC

Note: Please let me know, if any comments need to be removed or modified. Reviewing will help us and others who are viewing this post.

Sunday, March 24, 2019

How to clear node level Datapages on each node

To clear Datapage on each node in Pega PRPC:

In Pega PRPC, using data page will improve the performance of the application, but when its used as necessary way. whether if its really required for Node level or if its required for Requestor Level.

In Some applications unwantedly datapages has been used, and it will have validity of lifetime, means it wil be there till server restarts or pega destroys, when exceeding the maximum allowed now of data pages. As a result, server memory consumption will increase and it will be collected by Garbage collector.

So without disturbing the application or changing the datapage rule, we will see how we can clear the datapage daily, by running the agent, it will be bad way of design, but it will be useful for the application running in the production.

Below mentioned can be called in agent rule and to run it daily morning to clear the node and enable it in all the nodes.

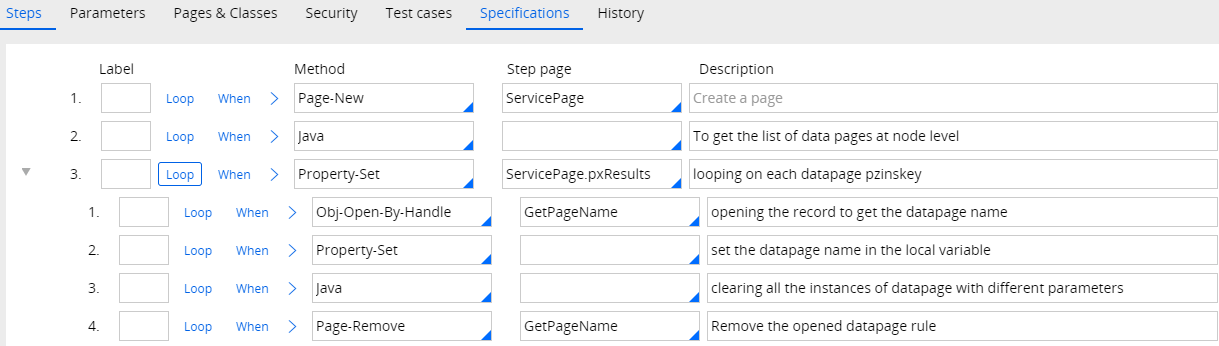
Steps to clear the Datapage cache:

Pseudo code of the activity:

  1. get the list of declare page currently in the node using engine api, which will return the pzinskey of the declare page.
  2. iterate on it and form Page list.
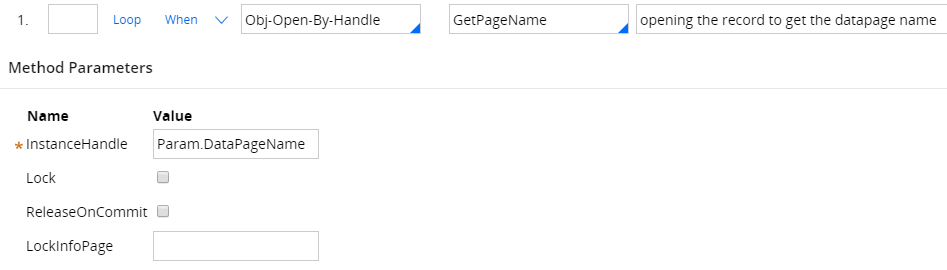
  3. Iterate on each page and get the declare page name
  4. using engine api, to clear all the instance of the declare page.
Activity screen shot are given below:


Step 1: create a page new to hold the list of datapage names, which is of class "Code-Pega-List".
Step 2:  With Java method. Paste  below java code there.

PRNode node = tools.getRequestor().getNode();

result1 ="Node-->"+ node.getNodeUniqueID();
java.util.Set resultSet = node.getDeclarativePageNames();
ClipboardPage ServicePage = tools.findPage("ServicePage");
ClipboardProperty pxResultProperty = ServicePage.getProperty("pxResults");
Iterator Itr=resultSet.iterator();
try{
while(Itr.hasNext()){
    //ClipboardPage result2 = (ClipboardPage)Itr.next();
 //String result3 = result2.getName();
 String result3=(String)Itr.next();
  ClipboardPage cd = tools.getThread().createPage("OCBC-Div-Unit-VISA-Work-ServiceRequest","ServicePageResults");
  cd.putString("pyLabel",result3);
  pxResultProperty.add(cd);
  
}
  }
catch(Exception e){
  oLog.infoForced(e);
}

Step 3: loop on page list created.
In step 4 java method:
pega.getDeclarativePageUtils().deleteAllInstancesOfDeclarativePage(result1);

In step 5: page remove method to remove the unwanted pages.

Execute the activity and see to remove the data page from the clipboard.

Note: If you have comments or corrections, please let me know, will update in the post.


Thursday, November 15, 2018

Pega Differ Tool

Pega Differ Tool - Pega PRPC Exchange Component

Pega Exchange Components had given some tools which are developed by pega partners. It can be used by anyone and for some tools which has license which need to be obtained from their companies.

In this blog we will check about Pega Differ Tool.

Pega Differ:

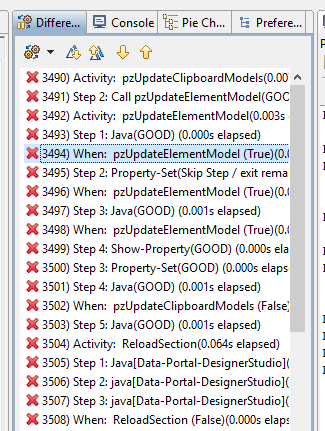
This is used to identify differences in execution patterns between two traces by highlighting difference while also allowing users to ignore minor differences based on particular attributes

This tool can be downloaded from:
https://community1.pega.com/exchange/components/pegadiffer

Scenario for easy understanding:
Some times in our application(consider environment Dev and Prod), in Dev one functionality is working and in prod the same functionality is working. So we usually execute, run the tracer and compare it with each other. step by step we need to compare each values. That is tedious job to identify the issue.

In Pega Exchange, We have one tool available, "PegaDiffer" to compare the results of the tracer and check it easily.

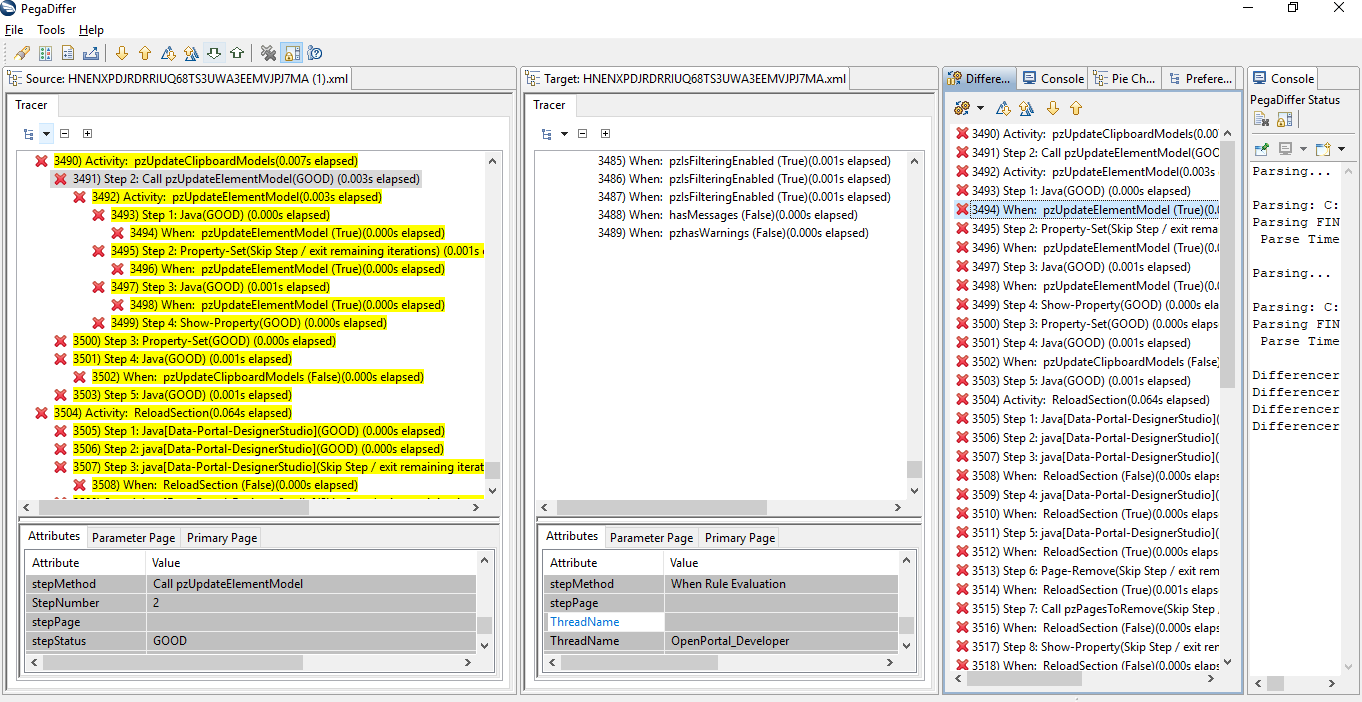
Pega Differ Tool looks like:


Steps to use the Pega Differ:
1)Run the tracer in Dev or any other environment to compare and save the result.
2)Same way run the tracer in other environment which needed to compare and save the result as well.
3)Open the tool and load the two files.

In the tool, Under Source Tab, Click the icon  , to load the source file ( in our case, its dev environment).  And under target Tab, click the same icon to load the file(ie. Prod Environment).
-- source tab


-- Target Tab

once its loaded, we will get the list of differences between the traces.
Whether its been called in the source or target and any difference in the value of properties.

If same values are present in the source and target, then it display as below, no highlights will be there.


If differences are there, then it will highlight as below:


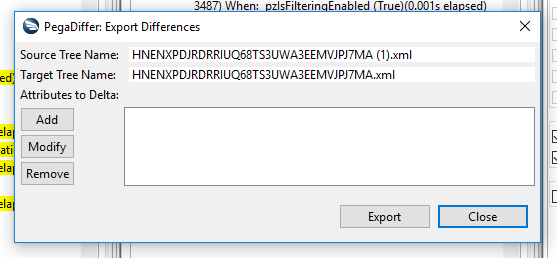
Then these differences can be exported to excel sheet.


Note: Please let me know, if any need to modify.